Using Excel file data
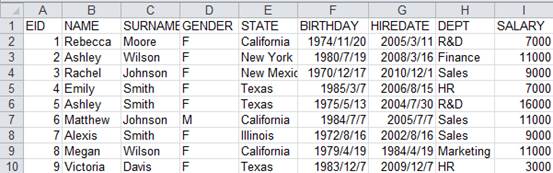
First let’s look at data importing. The target files are data.xlsx and data.xls (excel97-2000 format). They respectively contain sheet0 named employee and sheet1 named orders. The following is employee:
And this is orders:

esProc script for importing data from the Excel files:
|
|
A |
|
1 |
=file("D:/files/work/excel/data.xlsx") |
|
2 |
=file("D:/files/work/excel/data.xls") |
|
3 |
=A1. xlsimport@tx() |
|
4 |
=A2.xlsimport@t(ORDERID,SELLERID,AMOUNT,ORDERDATE;"orders",3:-3) |
A1: Define a file object; the path and name is D:/files/work/excel/data.xlsx.
A2: Define a file object; the path and name is D:/files/work/excel/data.xls.
A3: Import data from A1’s file object using the xlsimport function. @tx are function options. @t makes the first row the column names; without it, esProc will name the columns “_1,_2…” automatically. @x represents an xlsx file format; without it, esProc will try to determine the format according to the filename extension; if it fails to determine the format, it will import the file as xls format. Here without input parameters, the xlsimport function imports all data from the first sheet:
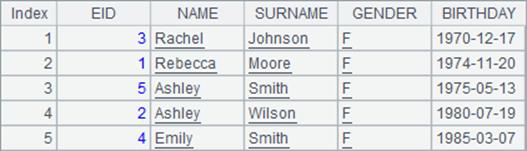
A4: Import data from A2’s file object using the xlsimport function. @t makes the first row the column names. The input parameters (ORDERID, SELLERID, AMOUNT and ORDERDATE) specifiy that the correponding columns will be imported. The parameter “orders” specifies the name of the to-be-imported sheet. Parameter “3:-3” specifies importing data from the third row to the third-last row. Similarly, you can import data from the 3rd row to the 100th row, which is 3:100. Note: When setting the starting row for the import, the use of @t option will position headers on the starting row. In this instance, the header row needs to be the third row; otherwise there’ll be error about the table structure. The resulting table sequence is as follows:

Then let’s look at how to write data into an Excel file. Suppose the results of A3 and A4 in the above will be written into the re-emp sheet of the result1.xlsx file, and the r-orders re-emp sheet of the result2.xls file respectively. esProc script for writing them into the Excel files:
|
|
A |
|
1 |
=file("D:/files/work/excel/data.xlsx") |
|
2 |
=file("D:/files/work/excel/data.xls") |
|
3 |
=A1.xlsimport@tx() |
|
4 |
=A2.xlsimport@t(ORDERID,SELLERID,AMOUNT,ORDERDATE;"orders",3:-3) |
|
5 |
=file("D:/files/work/excel/result1.xlsx") |
|
6 |
=file("D:/files/work/excel/result2.xls") |
|
7 |
=A5.xlsexport@tx(A3,EID:EMPLOYEEID,NAME;"r-emp") |
|
8 |
=A6.xlsexport (A4;"r-orders") |
A5, A6: Define two file objects as required.
A7: Export the result of A3 to A5’s file object using xlsexport function. @tx options mean the exported file format is xlsx and the first exported row is the field names. The input parameter A3 is the to-be-exported table sequence. The parameters – EID:EMPLOYEEID and NAME – specify the to-be-exported fields, in which EID:EMPLOYEEID means EID field will be renamed EMPLOYEEID when exported. Parameter "r-emp" specifies the name of the exported sheet. Here’s the exported Excel file:

A8: Export the result of A4 to A6’s file object using xlsexport function. Without the @tx options, the exported file format will be xls determined by the filename extension and the first row won’t be exported. The input parameter A4 is the to-be-exported table sequence. All fields will be exported as none is specified. The parameter "r-orders" specifies the name of the to-be-exported sheet. Here’s the exported Excel file:

esProc also support exporting data from cursor to an Excel file. For example:
|
|
A |
|
1 |
=file("D:/files/work/excel/data.xlsx") |
|
2 |
=demo.cursor("select * from EMPLOYEE") |
|
3 |
=A5.xlsexport@txs(A2;"employee2") |
Since cursor is often used to handle a great amount of data, xlsexport () function uses @s option to handle the data export in a stream style. But as a data import will precede the export to an Excel file, the to-be-exported xlsx file shouldn’t be too large. Besides, Excel imposes a restriction on the number of records written from an Excel file to an Excel sheet, which is 1000,000. Once the maximum is reached, the export will stop automatically.
esProc also provides the xo.xlscell(a:b,s,t) function to update a sheet named s with string t starting from cell c. The text of t is separated by Tab to represent multiple columns, or by carriage returns to represent multiple rows. For example:
|
|
A |
|
1 |
=file("D:/files/work/excel/data.xls") |
|
2 |
=A1.xlsopen() |
|
3 |
=A2 .xlscell("A1":"employee","COL1\tCOL2\nV1\tV2") |
A3 modifies page employee of the data.xls file starting from cell A1. The string t includes tabs and carriage returns. After execution, values of A1, B1, A2, and B2 are all changed:

9.1.2 Installing esProc Desktop and Excel add-ins
The features explained in this section only appear in esProc Desktop edition. Users using the other editions can choose to skip them.
Download esProc Desktop installer in the following official website:
https://www.scudata.com/download-desktop
Then execute the installation program, and follow prompts to complete the installation process step by step. esProc Desktop edition can only run under Windows.
If you need to use esProc Excel add-ins, Windows and Excel should be 64-bit versions. On this basis, run esprocDesk.exe in the installation directory to start esProc Desktop as the administrator:

Click Tool -> Install Excel add-ins to install the Excel add-in. If the installation succeeds, the result of executing the operation is as follows:

After the add-in is successfully loaded, the spl() function will be added in Excel to compute esProc functions.
9.1.3 Using esProc in Excel
The features explained in this section only appear in esProc Desktop edition. Users using the other editions can choose to skip them.
The basic form of spl() function is spl(exp). Compute the expression in esProc and return the result. For example:
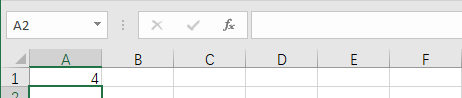
Enter =spl("=5.(rand(10))") in cell A1 in the above Excel file. The esProc expression "=5.(rand(10))" is a string headed by the equals sign. Then press Enter, confirm the expression, and get the following result:

A random integer within 10 is entered into A1. Actually, the result of computing A1’s expression should have been a sequence. If you need to return the whole result, press Ctrl+Enter while confirming the expression. Reselect cell A1 and press Ctrl+Enter at the same time to get the following result:
Now A1’s expression is recomputed and the result sequence is entered to the Excel spreadsheet.
We can add parameters to spl() function in the form of spl(exp, arg1,…), which is similar to the use of eval() function. We use quotation marks (?) to represent the parameters in the expression in order; or use ?n to represent the nth parameter. For example:
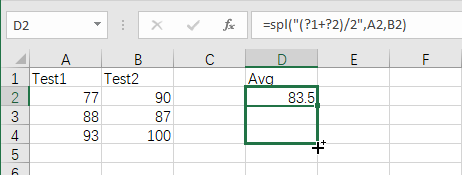
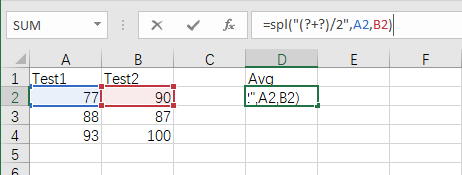
Compute the average score of two tests using spl() function in D2. The expression can also be written as =spl("(?1+?2)/2",A2,B2), which returns the following result after execution:

If we select D2 at the left corner and drag it to D4, its expression will apply to the whole selected area, where parameters will be adjusted according to position:

When using esProc add-ins in Excel, we often use E() function to generate a table sequence. For example:

When the parameter of spl() function is set up as a stretch of cells in the Excel file, data items in them will be transformed to a two-dimensional sequence and passed to esProc for computation. It is convenient to do this with E() function. To type in formula =spl("=E(?)",A1:B4) in D1 and press Ctrl+Enter to get the following result:

When result of computing spl() function is entered, it overwrites the original data in the Excel spreadsheet. So, you need to pay special attention to it. The spl() function can perform more computations on the table sequence generated by E() function and get the expected result. To modify D2’s expression into =spl("=E(?).derive((#1+#2)/2:Avg)",A1:B4), for example, and press Ctrl+Enter to get the following result:

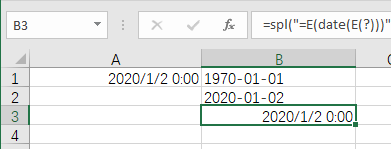
There is another point. Different from Java, Excel uses its own format for datetime data. For example:

Execute the statement and get the following result:

esProc gets a date data in a different format from that in Excel, which uses a unique datetime format. We can use E(x) function in a spl statement to convert an Excel date specified by x to a generally used format. For example:

Execute the statement and get the following result:

Note that results of both B1 and B2 are actually strings displayed in esProc, which are different from the Excel format date data. If you need to an Excel format date, just use E(x) function again to convert a general format date specified by x to an Excel datetime, as shown below:

Execute the statement and get the following result:
The value of B3 is a number, which is the actual value for the Excel date. Once B3’s format is set as date, the date can be displayed normally:

Find more about executing Excel data handling in esProc in esProc Desktop and Excel Processing.