Data files
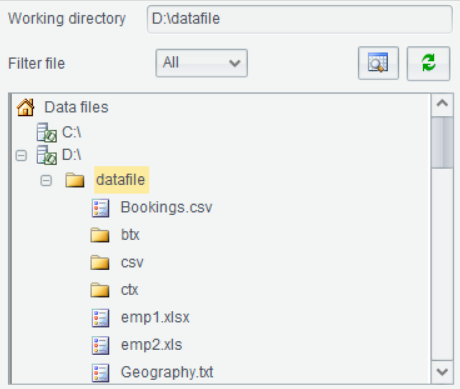
All directories and data files in the current machine will be automatically listed on “Data files” panel. Six file formats are supported, including txt, csv, xls, xlsx, btx and ctx.
Click a directory name in the data file tree and the system will automatically take the directory as the working directory, which can be regarded as the main directory. You can select files of specified formats in the working directory through “Filter file”. Filtering types are shown below:
【Text】 List files of txt and csv formats;
【Excel】 List files of xls and xlsx formats;
【esProc】List files of btx and ctx formats;
【ALL】List files of all the six formats.
For example, click D:\datafile directory and set filtering type as ALL:
Select data files of txt, csv, xls, xlsx and btx formats, and double click
them or click ![]() to automatically add the selected file to
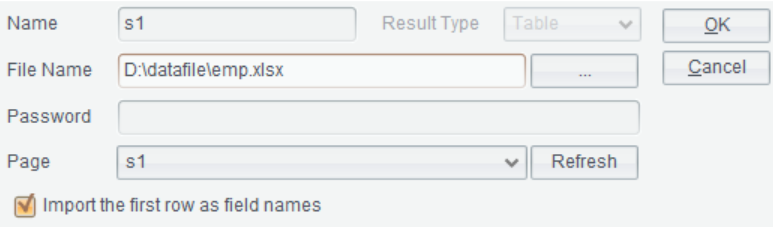
“Result”. By default, a result set name uses the data file name. Double-click Georgraphy.txt,
for instance, we can see the file displayed in the interface:
to automatically add the selected file to
“Result”. By default, a result set name uses the data file name. Double-click Georgraphy.txt,
for instance, we can see the file displayed in the interface:

Note:
You cannot view a composite table file (ctx) directly or open it through double click.
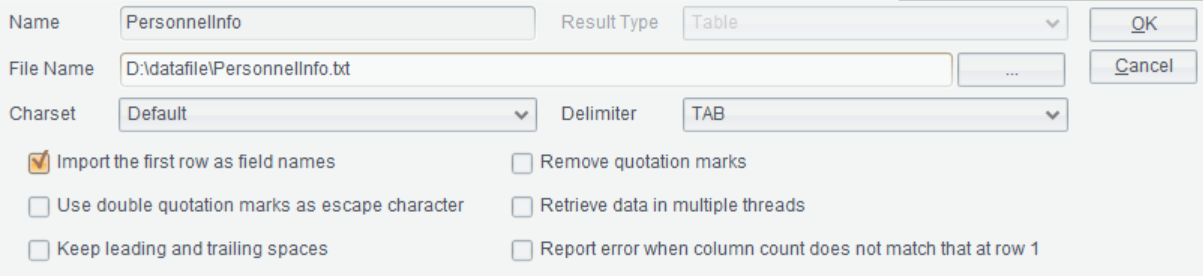
Usually, a data file that can be automatically opened under “Result” has a general format. For a data file with a non-general format, we can execute an SPL command to output its data to the result set.
For example, we have the following text file:

This is a comma-separated text file. Double-click it and the opened result set does not recognize commas but reads the first row as a single field instead, as shown below:

In this case, we can write an SPL command using f.import@t() and adding the comma-separated option @c under “Edit command” to read the data file correctly.
SPL command: file("a.txt").import@tc(). Execute the command and we get the following result:
Click ![]() to give a name to the result set. Then we
can perform add, delete, modify, export or other operations on the result set.
to give a name to the result set. Then we
can perform add, delete, modify, export or other operations on the result set.
We can also drag a file in “Data files” tree to “Edit command” zone. The file name will be automatically written to the position cursor is placed in the zone. For example, we enter $select * from in the edit command box, drag student.ctx file to “Edit command” zone and the file name “student.ctx” is automatically added to the end of the command. Click “Execute” and we get the following result: